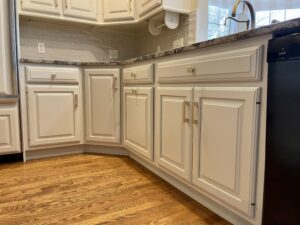
What Is The Best Paint for DIY Kitchen Cabinets? And What’s The Difference?
As a professional painter, I have spent countless hours in discussions with both homeowners and other contractors talking about what is the best paint for kitchen cabinets. It seems that everybody has a different idea about what works best, and all of the information can be overwhelming. This article will explore the kitchen cabinet painting process, and the pros and cons of each different type of finish. I will also discuss the prep and priming stages, and what has worked best for us over the last 7 years and 150 sets of painted kitchen cabinets. One thing to remember is that paint chemistry is constantly changing and improving. Therefor, what worked best yesterday will not necessarily be the best for tomorrow…
CLEANING – We have 3 basic options here. Environmentally-friendly, toxic, and solvent-based. Unfortunately, the worse these products are for you, typically the better they work. We spent many years trying to keep things safe and non-toxic, but we have found that for adhesion and lifespan of the cabinet paint that the safe stuff just doesn’t get the job done as well. The issue is most often the complexity of the dirt and grime that has built up on the cabinets calls for a suitable chemical that can break down more than one type of buildup. Here is a brief summary of “the best in class” of cleaners, and what they work best on:
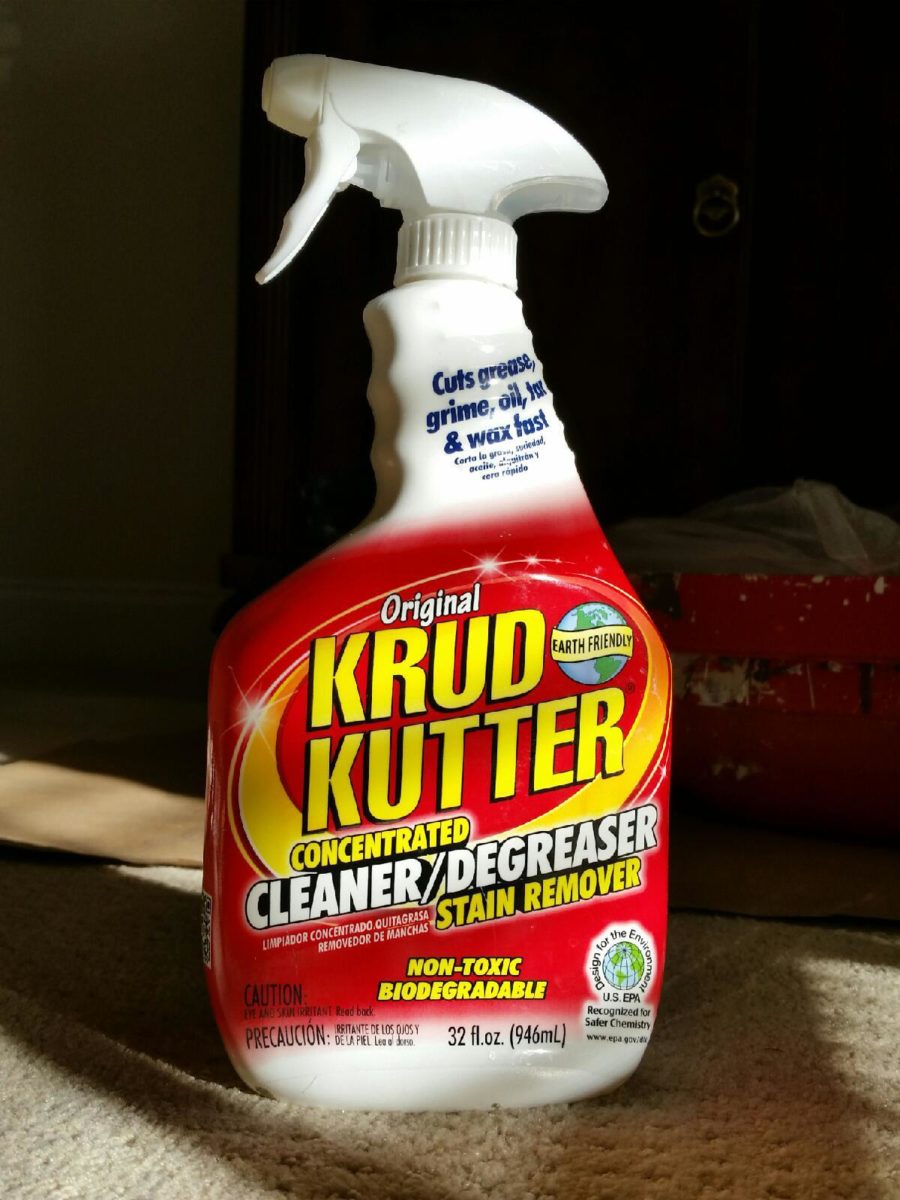
Krud Kutter (Environmentally-friendly) – This wonderful degreaser works so well on grease that it is the only cleaner I use in my own home when I am not disinfecting. For painting purposes, it does wonders for cleaning doors and walls, and can be used on cabinets that are newer and start off fairly clean. Dilute up to 4:1 and still get great results. Really the only choice for non-toxic cleaning in my opinion.
TSP (toxic) – Trisodium Phosphate was the go-to choice for paint prep type cleaning for decades. It is versatile and can be used on a variety of substrates ranging from metal siding to brick to paint. TSP cleans up a wide variety of staining, grime, and grease. It is also damaging to humans, plants, and animals, and should be used in a well ventilated area. TSP’s main drawback is it involves scrubbing grease and buildup with a waster-based mix that can soak into cabinets. This moisture can become trapped in the wood – especially on the edges and around insets, and comeback to haunt you. I have also found that sometimes waxy buildup can remain despite heavily concentrated mixtures and lots of elbow grease. Use eye protection if you work with TSP, and be certain to leave a day or 2 for your cabinets to dry COMPLETELY before adding paint.
Solvent-Based Cleaners – There are many choices here. In a nutshell, they work really well and have the advantage of drying almost instantly. They have the disadvantage of being able to get into your system through you lungs, skin, and even your eyes. Make sure all skin is covered adequately and safety goggle are worn at ALL TIMES around these types of chemicals, and keep pets in a far corner of the house (better yet get them out completely). Here is a list of basic solvents and what type of buildup they work best on:
Denatured Alcohol – Degreasing and general cleaning.
Lacquer Thinner – Degreasing and general cleaning, like denatured alcohol on steroids. Also de-glosses to help with adhesion.
Naphtha – Works great for breaking up waxy buildup often found on the upper lip of doors below the sink or near a trash can.
Wil-Bond – Combines many of the most potent solvents into one convenient can that will clean pretty much anything. This product will also eat the skin off your bones. Excellent cleaner but proceed with EXTREME caution with this and any of the above mentioned products.
Combine this with a light scuff sand (no, stripping off/completely removing original finish is NOT necessary) and you are ready for primer!
PRIMING – Again I am going to stick with the 3 main options here. These are: Water-based primer, oil-based primer, and shellac-based primer.
In short:
Water based – Can be a great choice for adhesion, but does NOT block out stain and wood tannins. NOTE: The label will say it blocks tannins but don’t believe the lies! This is a huge negative and usually means it is used in tandem with another primer for cabinets. If we are in a situation that calls for a water-based primer we prefer Insl-X Stix urethan acrylic. It is super durable and has some of the strongest adhesion we have found on the market. Water-based products are the easiest to work with and have the lowest odor (in most cases) on the list, and also dry relatively quickly.
Oil Based – This category of primer has great adhesion, and dries to a very hard, durable finish. It also has some stain blocking properties (2nd best option for this), and is very good when changing colors due to it’s high hiding properties. The downside here is that oil typically takes a long time to dry. Oil also has a very strong odor that can linger for days if not weeks.
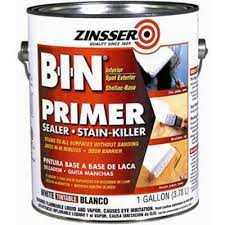
Shellac Based – This is NOT the clear shellac that your dad used in the wood shop in the 70’s. This is a pigmented, sticks to almost anything, fast-drying option. Shellac-based primer can be used on bare wood and stained wood alike. While it does not hide color changes as well as oil-based primers, it more than makes up for that with it’s superior stain blocking. It does have a very strong odor, but this dissipates in hours rather than days. Just Add Paint thinks of shellac-based primer as a problem solver for areas that others primers may fail. For this reason it is a go to for painting kitchen cabinets. In some cases it is used in conjunction with a water-based for extra build/adhesion when necessary.
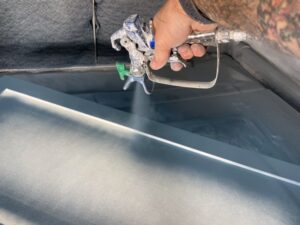
PAINTING – Now that we have examined the prep and priming steps, it is time to talk Top Coats. Please remember that if the right steps have not been taken thus far, the top coat is destined to fail. Assuming we have done our cleaning and priming, let’s discuss options for paint on kitchen cabinets.
Water Based: Water-based paints are by a long shot the easiest to work with for the average homeowner. Water-based paints are a great option because they can be rolled or sprayed, have low odor, and dry at a medium pace. They are forgiving and easy to work with, and perform well in most categories needed for kitchen cabinets. They have decent coverage and hide, good adhesion, good color retention, and good durability. But please remember not all water-based paints are created equally, and you will need to do some research before you buy. Plan to spend $40-$80 per gallon for something that is high quality and will last. We recommend Sherwin William Emerald Urethane Satin for a water-based finish. Emerald Urethane is user friendly and is readily available in most colors. Additionally, it is fast drying and is quite durable for the cost. The downside here is that because it is water-based, grease and general wear can eventually take a toll over the years even when it was applied perfectly.
Oil Based: Oil-based paint was the main paint used for interior trim and cabinets for many years before water-based options came along and stole its thunder. The properties that make oil-based paint a good option (excellent adhesion, high-hiding, great durability) are unfortunately also responsible for making this paint yellow over time. Other qualities that keep us from recommending oil include a very slow dry time, lingering odor, and it is difficult to work with in general. Even someone who paints daily can have trouble with heavy brush marks and unevenness.
Hybrid: This category of paint is relatively new to the market, and has been gaining quite a bit of attention over the last several years. These paints combine the best qualities of water-based paints and mix them with other types of topcoats to get the best of both worlds through modern chemistry magic. My Benjamin Moore paint representative told me the process works in a similar manner to a time-release pill – as the latex dries it slowly releases and becomes something else entirely. There are tons of these types of products flooding the market at the moment, but top performers is Benjamin Moore Advance (waterborne alkyd). This product is quite durable for water-based, but can still break down over the years. The drawbacks include a learning curve since they are different consistency, and also a slow dry time. Most contractors I know wait a full day before applying a 2nd coat, which will add several days to a cabinet project if doors are being painted flat. Also of note, these formulas are still fairly new and updated regularly. They seem to improve year by year, and we expect they will become increasingly popular as the industry moves forward.
FOR THE DIY HOMEOWNER, I would limit the choice to these 3 categories of product. There are countless other types of finishes, but nothing that compares to these top choices for ease of application with no need for sprayers or other special equipment/training.
OUR RECOMMENDATIONS???
-Start with a Krud Kutter wipe down using a scotch bright pad or something similar. Some people prefer to do this while the doors are still hanging, but be careful not to miss edges.
-Sand lightly using paper with a 150 grit or higher.
-Wipe cabinets clean using a rag soaked in denatured alcohol. This should be adequate unless your cabinets are really, really dirty.
-Prime with Shellac-based primer by BIN and a foam roller if you are going over something that is stained. This primer is tintable even through the person mixing it for you might not know that. Use caution, as that this primer is VERY thin and should be applied lightly to avoid drips and runs. Do not panic if you have imperfections, as shellac-based primers sand very easily. If you are painting over previously painted cabinets, you can also use BIN. If you would like something that feels more like the paint you are used to try INSL-X Stix. Stix has a slower dry time, but excellent adhesion. If doing a drastic color change this is the choice for you. Sand between coats, and after final coat of primer. WEAR A RESPIRATOR when working with these paints. Spend the $40 on a standard 3M respirator with filter cartridges, your lungs will thank you!
-As tempting as it may be, DO NOT caulk any insets where the cabinet joins meets. These areas look like they need caulk, but they are built that way to allow for movement. This may be less of an issue in parts of the country where temperature is consistent and humidity is low, but will wreak havoc at change of season in the NorthEast.
-Once your primer is dry and sanded, and a scratch test has been performed, it is time for your top coat. Make sure all dust and sanding residue have been removed from your surfaces. Assuming you are not experienced with a paint sprayer, brush and roll doors and drawers while laying flat to avoid runs. We recommend a 1 1/2″-2″ high quality paint brush and a foam roller for this portion of the project. Use a light touch to make sure paint lays down evenly. Let paint dry, sand lightly with 220 paper and remove dust with a tack cloth, and repeat until coverage is adequate (typically 2-3 coats when using Sherwin Williams Urethane). Note that grainy wood may require more pressure from the foam roller to fill crevices, and also may require extra coats. We recommend you allow at least 72 hours for your cabinets doors and drawers to dry completely before handing them back up. Some darker colors may require MUCH longer. If the paint feels tacky the doors should not be hung.
-Maintenance: Do not clean or even wipe your freshly painted DIY kitchen cabinets for 30 days while the curing process occurs. After this period, cabinets should be cleaned first with warm water and a microfiber cloth. If that doesn’t work try a small amount of dish soap or diluted Krud Kutter 4:1.
We hope you have enjoyed this article on DIY kitchen cabinet painting. For more information on all things painting, please check out our website and facebook pages at:
Hiring a cabinet painter in Harrisburg? Start here: https://www.justaddpaint.net/hire-contractor-paint-kitchen-cabinets


We are having problems with the insul x. cabinet coat dry time is too fast! How do you slow down dry time when you’re brushing? Brushing white does not even give you time to lay it off it’s already roping up. I’ve been a painter for nearly 40 years and do expert brush work, but this stuff just drives too fast!
Hi Craig – I don’t use a lot of the Insul X, but I have worked with it enough to know that it dries really quickly. We use an additive leveler/extende to to slow dry time with pretty much all of our cabinet coatings. I think the Sunnyside M-1 does a nice job with latex products, and the 2k poly systems usually produce their own versions that we try to stick with. One other thing we have started to do (particularly when the heating system dries out our shop over the winter and on hot summer days) is run a humidifier. Ideally humidity should be between 50%-80% for painting cabinets, and the higher the humidity the slower the dry time. And it should be noted that I though running a humidifier was a ridiculous idea until I tried it and was shocked by the results. Good luck!
Thanks for the great article! I was planning a cabinet project (unfinished wood) using Emerald urethane and an HVLP gun. Is the BIN shellac primer overkill for bare wood starting point? Any advice on diluting the Emerald paint for HVLP application? Thank you!
Hi Bill – BIN shellac is a good solution for raw wood and/or MDF, with the only downfall being how thin the dry millage is. Emerald Urethane can be sprayed through and HVLP, but we felt it was pushing the limits of the gun/compressor due to its super heavy viscosity. You will definitely need one of the biggest tips (on a GRACO system this is a #6) and dilute to the maximum recommendations of that product – but it still won’t lay down the same as it would with an airless. The Sherwin Kem Aqua is actually better suited for cabinets IMO, and is much thinner. You can use a medium sized tip for that product, and as a bonus it meets KCMA standards for raw wood. Sherwin keeps this product well hidden for some reason, you may need to ask the store to order it for you. Cheers and good luck!
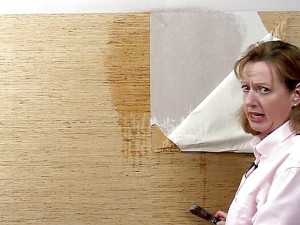
Thanks for the article. Very informative. We tried to do DIY with the Rustoleum Cabinet Transformations product in pure white over oak cabinets with dark stain. My wife used the provided degreaser but did NOT use a primer. We have three coats of their “bond coat” on and it looks great…until we add the provided top coat. After a week, we see tannins leaching. I wish we had found your article before starting. We have three coats of the bond coat on all cabinet doors and boxes. We are afraid we just wasted three weeks. My question is, what can we do now that we have three coats of paint? How do we even start over? Help!!!
Hi Jeff – It is horrifying how often we run into something like this on the job site. Off the shelf products should all come with warning in bold letters suggesting BIN shellac-based primer to block tannins when painting over any previously stained surface. I am afraid the only thing you can do in this case is prime with shellac and repaint. One other suggestion… We recently helped someone with a similar situation and we sprayed their doors in the shop for them, and they took care of their own boxes. It was much less expensive than a typical cabinet job because their doors were freshly painted and didn’t need any prep other than a light scuff sand. I realize this is budget dependent solution, but both parties were happy with the results in this particular case. Good luck!
I just had cabinets installed. They were custom and painted with a product / ingredient from SW (catalyzed lacquer). I want to take a piece of the trim to match it and buy a quart for future touch-ups. Which is easier For a DIY homeowner to touch up “dings”….SW Emerald Urethane or BM Advance?
Hi Dad – I am sorry I missed this one earlier. You have probably already completed the work. If not, I would consider both of those products to be medium difficulty. The advance levels out better but also dries much more slowly, UNLESS you have a dark color that requires a deep base, in which case the Sherwin Urethane can take literally a month or more to get hard. I once used the color peppercorn in that product and waited 5 weeks to install the doors and was still a little nervous about it not being at full-cure. The main argument for the urethane in this case is that the color matching would probably be more accurate since you are dealing with a Sherwin color to begin with, and I expect it is already in their system. Good luck if you haven’t painted yet, and otherwise please let us know what you used and how it turned out!
Can I use BIN shellac primer over another water based primer?
Hi – Absolutely. BIN works great for tannin blocking and problem solving in general. Its drawbacks are that is dries to a very thin millage, and it is more brittle than other types of products. A latex bonding primer, such as Stix, would also be a good choice if the topcoat is still intact. It has a thicker build and might hold up better long term if you don’t tannin or contaminant issues. I have used both options with great success over the years and have been leaning toward Stix recently when I don’t have tannins to worry about. Good luck!
hi. We just used SW Emerald Urethane in Satin for both oak and maple cabinets that had been primed 2X and sanded. We tried both a sprayer and brush. Both look gritty and also showed brush marks. Luckily, these were “test” cabinet doors. We are going switch to BM Advance.Will BM Advance in a Satin be a better look? do you recommend BM over SW for cabinets?
Hi Elaine – Emerald Urethane and Advance are both good paints for DIY. In general, the Advance lays down a little better for most people. There are a bunch of factors that could be affecting what is happening there such as color (dark colors react very differently than lighter colors), type of brushes and sprayer, temperature and humidity levels, and of course your experience and technique when applying. Are you able to send me a few photos of the test doors? My email is curtisjustaddpaint@gmail.com . I can probably give you some specific advice with a visual. Good luck and I hope to hear from you, Curtis
Thank you for your article. It seems the more we research, the more concerns we have. We will be painting our oak cabinets. BM recommended stix for primer adhesion and said that the varathane on the doors would stop the bleeding of tannins. You suggested that BIN is what you use for stopping the bleeding, but concern with brittle/cracking.
We do not want either bleeding or cracking, what should we use for our primer?
BM also recommended Dynamic cleaner degreaser. Would you recommend this product?
Thank you!
Hi Shirley – Thanks for getting in touch! Starting with the cleaning process:
I don’t know anyone who uses Dynamic cleaner/degreaser. That could be related to our area since BM is not quite as readily available as Sherwin or Lowes/Home Depot. We have had the best luck with krud kutter products, specifically the original formula and the TSP substitute. The original is also good for general house cleaning, the TSP substitute is better for tougher cleaning and not something I would use on a floor for example. I also wipe with denatured alcohol after cleaning and before I apply paint just to get any other random residue off the surface that might have survived basic degreasing.
Regarding the coatings:
Stix is an awesome primer for adhesion and getting some build. A lot of the folks who are doing DIY are having good results with using a combo of Stix as a bonding coat, and then using the BIN on top to seal in tannins/stain. If you are brushing and rolling (and even if you are spraying) you will need at least 2 coats of primer, and more often we get into a 3rd. My thought is 1 coat of the Stix and 2 of the BIN to make sure you are completely free of any bleed through. The BIN is a much thinner product than the Stix and will work its way into the grooves and pores that may still be visible and unsealed after the Stix. The grooves will need to be completely filled or stain may wick to into the topcoat down the road.
I don’t really know anything about the varathane. The only other systems I have experience with are some of the Italian coatings companies that are making industrial products. It would be tough to go through all of that in the post because it would be an entire book, but feel free to drop me an email if you would like to discuss future.
Lastly, bear in mind that you will most likely still encounter some issues at some point with the coatings system. A lot of the cracking will be dependent on the quality of the cabinets you are working with, as well temperature and humidity fluctuation. We know every trick in the book and use the best professional products money can buy and still have sets that are more prone to cracking.
Good luck with your project, and don’t hesitate to reach out with other questions!
Great article!
I have stained glossy red oak cabinets that I sanded and applied acrylic based PPG Gripper Primer. It’s been 5 days and I haven’t started painting top coat yet. I’m concerned about tannins and bleed through in the future, although I haven’t noticed any yet and cabinets were primed 5 days ago.
Since I do not have any bleed through at this point can I go ahead and paint top coats (SW Emerald Urethane Enamel in Pure White color)? If not, can a oil based primer or shellac primer be painted over acrylic primer? If so, can I apply SW Emerald Urethane Enamel over the oil or shellac primer? I’ve heard several conflicting opinions on these and hope you can clarify. Thanks
Hi Brant – That’s a great question! I see no reason you would not be able to add a primer over the gripper. My preference would be BIN since it does the best job tannin blocking. It should be noted that with oak, regular stain bleed through is often more of an issues than tannins – and I believe Gripper does a pretty good job with that. I expect emerald urethrae would go on fine over any of those primers. If you are able to email a couple of photos over I might be able to give you a more informed opinion. Thanks and good luck with the project!!! Curtisjustaddpaint@gmail.com
Help please- getting ready to paint solid oak cabinets- I have cleaned degreased and sanded- I have purchased BM advance primer- I have not started yet as I want to be sure this will be enough- the cabinets are 15 years old and solid wood- but I’m afraid of bleed through( not sure what you would call it) will 2 coats of this
Primer be enough to keep them looking white once I paint them?
Hi and sorry I missed this one! I am not certain about the BM Advance primer, I actually did not realize they made a primer to go with the topcoat series. Tannin bleed and dye-migration are both legitimate issues, as it surface contamination with grease. The most common primer I see recommenced for DIY is BIN shellac-based primer, because it is such a good problem solver and works wonders over so many different types of stains. We also used BIN for many years as our main primer. While it does have its issues (every paint does), I would probably suggest this as the best route to go for what you are describing. Good luck with the project, happy painting!
Thanks for the tips. I am going to spray my newly built cabinets. They are shaker style, maple rail and stile with a central MDF panel. I like the idea of the BIN primer over the MDF. Would you recommend it over the maple as well. What your recommended paint for spraying? I have a Graco Magnum Airless Sprayer. I was going to use SW Emerald paint
Hi Ron – Thanks for your question! I have used the BIN system over that same style door in the past without issue. The urethane is technically a trim paint and does not meet KCMA standards for cabinets (although lots of people use it for that). If shooting raw wood with Sherwin products I would recommend looking into the Kem Aqua series. Those products are designed for new wood and meet KCMA standards. You will need to shoot 2 coats of primer to get a good seal over the mdf. My experience has been that Kem Aqua flexes with the wood a bit better as it expands and contracts over time, and may be less likely to crack out. Many Sherwin stores do not stock the Kem Aqua, so you may have to ask them about it at the desk. I think I was using a .308 or .310 FFLP tip the last time I worked with Kem Aqua (blue housing, green tip. A little more expensive but worth it for the extra control).
Alternatively, most professionals I know are using either solvent or water-based 1K/2K poly systems (Kem Aqua is a 1K poly system). The water-based 2K are a little harder to find (depending on your location), but they hold up much better than any off the shelf product I know of for cabinets. Renner, Envirolak, and Milesi are the main companies I have experience with. All have excellent customer service if you wanted to investigate any of them. Feel free to email any additional questions to curtisjustaddpaint@gmail.com. Thanks and good luck with the project!
Thanks so much for this article – it helped me pull the trigger on starting my kitchen cabinet painting project. I went with BM Advance in Satin In the color Onyx, and I know dark colors tend to take longer to dry/cure than lighter ones. My cabinets have been completed for about three weeks now, and I’ve noticed that if I get any water on them and try to dry it, the sheen wipes right off and looks matte. There’s also visible color on the cloth I used to gently wipe them with. I tried to touch up those areas and the touch up looks horrible – completely different sheens. Luckily, it was only one door so I’m going to redo that door, but any ideas why this is happening? I’m assuming it’s because it’s not fully cured, but I’m not sure. Truly hoping I don’t have to redo this project again due to a paint mixing issue, etc. I had an oil based stain on the cabinets before but I sanded thoroughly, applied two coats of Zinssers Bullseye primer, and three coats of paint (used brush/roller combo, not a sprayer) with the recommended drying time between. I followed all of BM’s instructions. Thanks for your help!
Hi Nikki – I am happy to hear you pulled the trigger on the project, but the door issue sounds like no fun at all! If the sheen is changing and you are seeing color on the cloth it has most likely not cured completely. And sheen does build, so every place you do a touch up will have at least a small amount of extra sheen. I had a similar problem once with Sherwin Emerald in a dark color… I ended up starting over on just that one door (it was technically a drawer in my case) and leaving it off for close to a month and then reinstalling. I don’t think you would need to sand it the whole way down, you should be able to just prime over what you have and then recoat. I hope that helps – I know it will be pain but I am not sure there is another option. Good luck and please keep us posted!
Great article, thank you very much. Im curious, It was recently recommend that I use Dunn Edwards Endura-Coat vs their Aristoshield for my cabinet paint. Do you have any ideas or recommendations about this.
thanks
Hi Luke – Thank you for getting in touch! I don’t know any pros who have experience with either of those particular products. If the recommendation came from a professional that has used that product and knows what it will look like after it has been on the cabinets for a couple of years then you are probably good to use it! Theoretically I would expect the Aristoshield would be a harder finish since it is a hybrid urethane, but I would definitely want to hear some results about the product from someone what has followed up on it after initial appliation (because pretty much everything looks good before it gets use & abuse). I would add that in general, I think the Italian 1k/2k polys are miles ahead of anything else I have tried. The downside is those products typically have to be shipped, but Milesi and Renner sure do hold up well and continue to look great after years of normal kitchen wear. Emerald Urethane and Benjamin Moore Advance seem to be the products of choice on the DIY sites and I am sure do better than most paints, but I honestly don’t find them to be any more user friendly than the polys. Please let us know which way you end up going. And if you do use the Dunn Edwards I would love to hear a review!!! Cheers
Hi! I am getting ready to paint newly built maple/mdf cabinets. The builder primed them with a coat of BIN. I plan to lightly sand, reprime, lightly sand, paint, lightly sand and paint again (because I think this was my process years ago when I refinished my kitchen and bath cabinets). I plan to use Dunn Edwards Aristoshield, but there seems to be the least information about this product online because it doesn’t appear to be national. What I can find, everyone seems to be really happy with it. I am wondering if AquaKem or Melisi/Renner would be a better option. How does the process differ from paint? I plan to brush/roll the boxes and spray the doors with my old Graco 2900 spray station HPLV, that hasn’t seen the light of day for over 8 years. Also, should I reprime with BIN or go in with STIX? Thanks!
Hi Tess – Great question! I don’t use much BIN anymore, and I am not really familiar with Dunn Edwards Astroshield. Although I do think you will be good to go with 1 more coat of BIN (the HVLP will do a nice job on that with one of the smaller tips, like a #3 on the newer Graco systems), just remember that will need to be flushed out with Denatured Alcohol. Regarding the topcoat – I have seen a handful of reviews from professionals on Astroshield in the forums and I doubt it will hold up anywhere near as well as the Milesi or Renner. The Italian products apply the same as paint – and I honestly found them to be a little more forgiving/user friendly. I usually spray Milesi through an airless, but I sprayed it through the HVLP I used a #5 tip the newer Graco system. The viscosity is slightly different when you add the hardener, which I assume you are probably not going to do, but it is not so different that you will need a tip other than the #5. I use Clark Deco out of Pittsburgh for Milesi, their customer service is unparalleled and they can answer any questions you might have. It is a little nerve wracking to order online/over the phone with a product that needs to be shipped, but it will be well worth it for level of difference that product will make. If you have more specific questions please shoot an email to curtisjustaddpaint@gmail.com . And I can probably tell you how many gallons to order for your project if you send me a few photos. (The answer is usually 2). If I don’t hear from you good luck, and if you send over more questions I will get back to you ASAP. Cheers!
Hi, I found your article to be very informative and I greatly appreciate you taking the time to respond to my question.
I am currently working on building a bath vanity and will later start kitchen cabs. The vanity is a birch plywood box with popular face frame and door frames with MDF panels. I am leaning toward Italian 1k/2k polys waterborne coverings. I don’t have any experience with using these products. Can you recommend one for a newbie getting started. Should I add anything (hardner,etc) for the kit/bath application. I plan to spray with an airless. Please advise on best primer, pigment top coat and best practices. Thanks so much for any help you can provide.
Hi Anton – Thanks for reaching out, and I am happy you enjoyed the article! There are a bunch of different systems out there with the polys… my daily “goto” primer that works great on everything from raw mdf to finished oak is Envirolak 170. It is high solids and very thick, and also very forgiving/sands to a nice powder in no time. Their 200 series topcoat goes great with this primer, and it is nice to stay with the same manufacturer to avoid any possible non-compatibility issues that can come up. Alternatively Milesi also plays nicely with Envirolak if you wanted to go that route. 20 Sheen is what we typically use, and that is closest to a satin that normally comes on a new set of cabinets from the factory. The equivalent 20 sheen Envirolak product tends to have a hair less sheen than a 20 sheen Envirolak 200 in my experience.
Regarding the best practices, it is probably easiest for you to get out on those websites and take a look rather than me write you a book! Although I will say my main tips are that you will need 2 coats of primer, ideally with the hardener, and 1-2 topcoats (some guys claim they can get away with 1, def plan on starting with 2). In general, these products – compared to regular paint – work better when they are laid down heavier. I spray both of the products at 4-6 wet mils which is pretty heavy. The one area these products that tends to be LESS forgiving compared to a regular house paint is with temperature and humidity. You will need to refine this as you go (because it is different for everyone depending on airflow/thickness of coatings/application variables), but shoot for 68-72 degrees with humidity at at least 50%. Low humidity will cause these products to flash dry and often leads to issues like micro bubbles that you will want to avoid. Make sure you allow ample time for drying. Err on the side of letting them dry longer than the manufacturer recommends for your first couple sets in case you are spraying too thick. Lastly, I find that a .308 Fine Finish tip (blue housing, green tip in the Graco line) works best.
I hope this helps. Good luck and please feel free to reach out with any more questions…
Happy Painting!!!
Thank you for this helpful info.
I have 2 year old stained maple cabinets in good condition. I have always hated the color… too dark. I am getting estimates for having them professionally painted white. My first choice would be to have a refinisher totally spray them with a European coating. Two estimates have included this for around $11k. One estimate is to spray doors and drawer fronts, brush and roll frames/boxes and use SW cabinet paint for around 6k. I would love to have the European coatings but can’t budget for $11k. Is there an European paint that is very user friendly for those who have never used it before?
Any help is greatly appreciated!
Hi Joy – Thank you, this is a good question! First of all, that is a pretty wide range of price. The vast majority of the cost in refinishing is in the labor/craftsmanship, so I suspect the cost of materials is not a significant factor in these estimates. Spraying requires a higher level of skill and is typically more costly than brushing/rolling. This is not typically a $5000 difference for a medium sized set of cabinets in my neck of the woods, but it may be in other areas.
As far as a user-friendly European paint, I feel like most of them are fairly forgiving and not all that different from regular paint. They main differences I see are that the viscosity takes some getting used to, and the coverage is not as good (when brushing and rolling) because the poly systems are made to be applied at a very thick millage through a sprayer (typically 4-6 wet mills, which is a LOT of product). If you do want to give this one a go DIY, I would strongly suggest getting some sample doors to practice on, and then perhaps start with a vanity while you get up to speed. If my days of brushing and rolling are any indicator, I’m sure I was still improving over the course of at least the first 20 sets I did professionally.
Lastly, the most user-friendly primers I can think of are made by Envirolak, Centurion, and Renner. I believe both Envirolak and Renner have single component systems (no hardener necessary) that do a great job with bonding as well blocking tannins using a water-based product. For the topcoat, I recommend staying with the same manufacturer if at all possible. Renner, Milesi, and Envirolak are the top 3 that I see most professional refinishers using. The results of all of the products will be much better sprayed, however, they can all be brush and rolled if you don’t mind some texture on your cabinets. We typically use 20 sheen topcoats, which is the equivalent of a stain finish. Again, start on a smaller set that you care less about than your main cabinets while you figure out the product and get your chops up.
Hope this helps, please keep us posted on progress and what you end up doing.
Cheers!