EARLY WINTER 2019 PROJECT PROFILE: PAINTED KITCHEN CABINETS IN MECHANICSBURG, PA 17050
A KITCHEN MAKEOVER IN MECHANICSBURG BRINGS KITCHEN CABINETS BACK TO LIFE. AKA THE BEST CHRISTMAS PRESENT EVER…
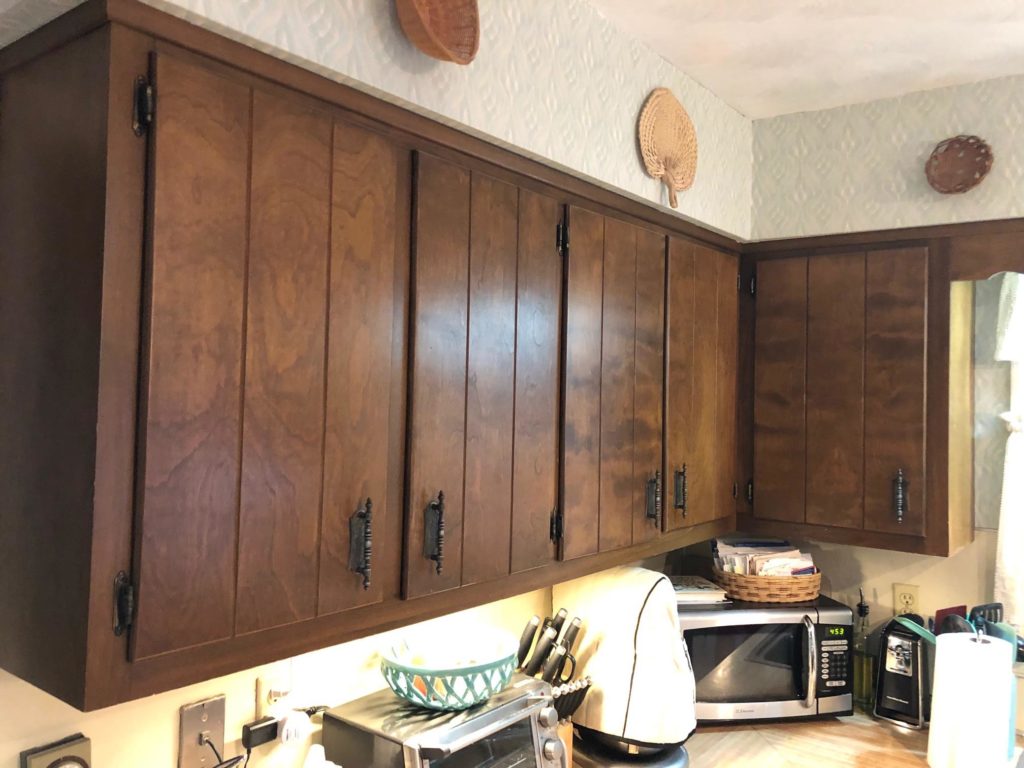
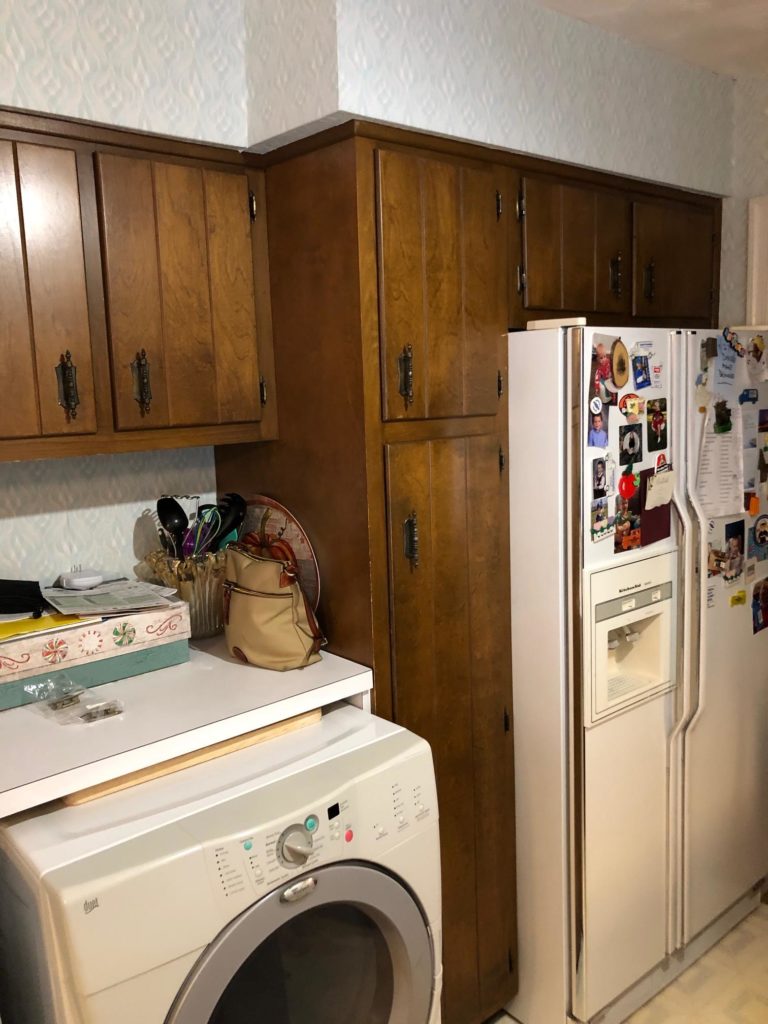
Reason for client contact: The new owner of a classic Mechanicsburg ranch house from the 50’s was looking for a change. (The author has a soft spot for the 50’s homes because he lives in one too). Our client was in the process of a major kitchen renovation, and needed some finishing touches. Like most people, she had a tough decision with painting vs replacing her cabinets with something new. After pricing replacement cabinets (over $10,000) she was leaning toward working with what she has. Her final decision was based on loving the profile of her current cabinet doors and not being able to locate a suitable replacement. As it turns out, the 50s were a glorious period for woodwork and those styles are no longer made! CG heard about Just Add Paint from another client, which is why we love references! She completed additional research on Angieslist.com and our Facebook page. From there, she decided we looked like a good match.
Utilized Services: CLEANING, PRIMING, AND PAINTING OF KITCHEN CABINETS
PREP AND CLEANING:
- Countertops and floors completely protected from paint. Our method for this is typically a combination of frog tape with paint blocking technology combined with butcher block paper and plastic. Butcher block paper is great since it absorbs paint drops/overspray and will dry any rogue paint spots immediately. The plastic we use is a little more durable and provides a sturdier protection for high traffic areas.
- Cleaning began by giving the kitchen cabinets a good scrubbing with Krud Kutter degreaser. Krud Kutter is a favorite product of ours because it is one of the rare biodegradable cleaners that actually works. This set had a heavy buildup of grease from 50 + years of use. We utilized green scratch pads attached to our sanders for a little extra power. Some old school painters may call this cheating – we like to call it “doing a better job”. Use Krud Kutter full strength for heavier duty cleaning, and dilute up to 4:1 for lighter duty work. We remove the doors after cleaning. We number the doors and carefully pack them for transportation back to our shop. While we can spray on site, most customers prefer that we keep the spraying process OUT of the house.
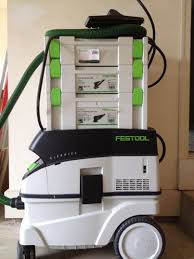
- Once we degrease and remove the doors it is time for sanding. We use a Festool dustless HEPA vac sanding system to ensure dust is kept to an absolute minimum. Flatter pieces require a standard shaped palm sander, heavier profile (front side in this case) use a profile specific SurfPrep tool. See bottom of page for more info on these incredibly awesome and time saving products.
PRIMING:
- We complete a final wipe down with denatured alcohol. This product removes dirt and stubborn grease that might have survived rigorous degreasing. From there, Just Add Paint utilizes many different primers on cabinets depending on the situation. In this case we needed something that had great adhesion and also great stain-blocking capability. The best choice here is generally a shellac-based product since these excel in both categories. BIN shellac is our typical choice, but we went with Sherwin Williams newly formula shellac for this set. The results were impressive in all our favorite categories – adhesion, durability, coverage, and stain blocking. Unfortunately ALL shellac-based products have a terrible smell, and this version is no exception. However, smell dissipates much more quickly than a standard oil and is worth suffering though for a superior finished product. We recommend shellac-based primers for professionals and DIYers alike as long as you have a proper recirculating respirator.
- Another added benefit of priming is that the scratches, dings, and areas requiring caulking become much more visible. Crackshot outdoor rated spackle is out goto for this, and Bondo is great for extra hardness. Elastomeric Caulk has more flex than the standard variety and allows for wood movement without cracking.
PAINTING:
- We complete a final sanding (220 grit), and it is finally time for paint! The cabinet boxes in house were painted by hand, and the doors and drawer faces were sprayed at the shop. Spraying at the shop serves 2 purposes: 1) It keeps the mess of overspray OUT of the customers home, and 2) It gives us MUCH better control of the environment concerning temperature, humidity, and dust control. We have a custom built spray booth is set up specifically for the type of sprayer systems we use. This is critical in creating a factory-like smooth finish on the doors and drawers. A filtered negative air machine cleans the air, and fresh air is brought in to replace it.
- For this project the customer was looking for an extremely durable finish, and we used a 2k poly system. 2K poly is paint industry speak for water-based lacquer. The system utilizes additives (hardener and leveler) to help it pass the most stringent tests of durability, stain-blocking, and heat/humidity resistance. 2K poly is challenging to apply but well worth it for the high quality end results. This is a fast-dry product, and 2 coats were applied back to back. The back sides of the doors were painted first, and the front side is typically painted the following day. Both sides of the door are OCCASIONALLY painted on the same day, but only when drying conditions are *perfect*. Once painted, doors harden-up for at least 24 hours before being installed at our customer’s residence. This could be done with a little less cure time if pressed for time, but better safe than sorry with fresh coatings.
PRODUCTS USED:
- Krud Kutter Degreaser. Consistently a Just Add Paint favorite 10 years running…
- Sherwin Williams mini-rollers
- Bercom HandyPail paint bucket with liners. appleseedproducts.com
- Sherwin Williams White Pigmented Shellac https://www.sherwin-williams.com/homeowners/products/white-pigmented-shellac-primer
- Milesi 2k poly with additives https://www.clarkdeco.com
- Denatured Alcohol (cleaning and reduction of primer)
- Sherwin Williams blue can spackle
- Yellow and Blue version Frog Tape https://www.frogtape.com
- Crackshot Spackle
- Bondo automotive putty
- PPG Top Gun Elastomeric Caulk
- Festool HEPA (Lead Certified) Dust Extractor Dustless Vacuum Sanding System. We utilize this in 100% of jobs, because it guarantees the safest, cleanest environment possible any time sanding is necessary. These things are expensive, but we can’t imagine not using them- we try to live by the rule, “better safe than sorry!” https://www.festoolusa.com/campaigns/landing-page/ct-compact-mini-midi-with-bluetooth
-
- SurpPrep profile sander Ray 3×4 model https://surfprepsanding.com
Challenges of the Job:
- Temperature and humidity are the number one challenge with cabinet painting over the winter: The NorthEast is a great area to live in you like change of season. However, the need for heat in cold months lowers humidity drastically. Lack of humidity does not have much affect on house paints, but poly systems are very temperamental with low moisture. Just Add Paint sprayed the doors on the warmest, most humid day of the week to combat this. We also used a whole house sized humidifier turned up to 11…
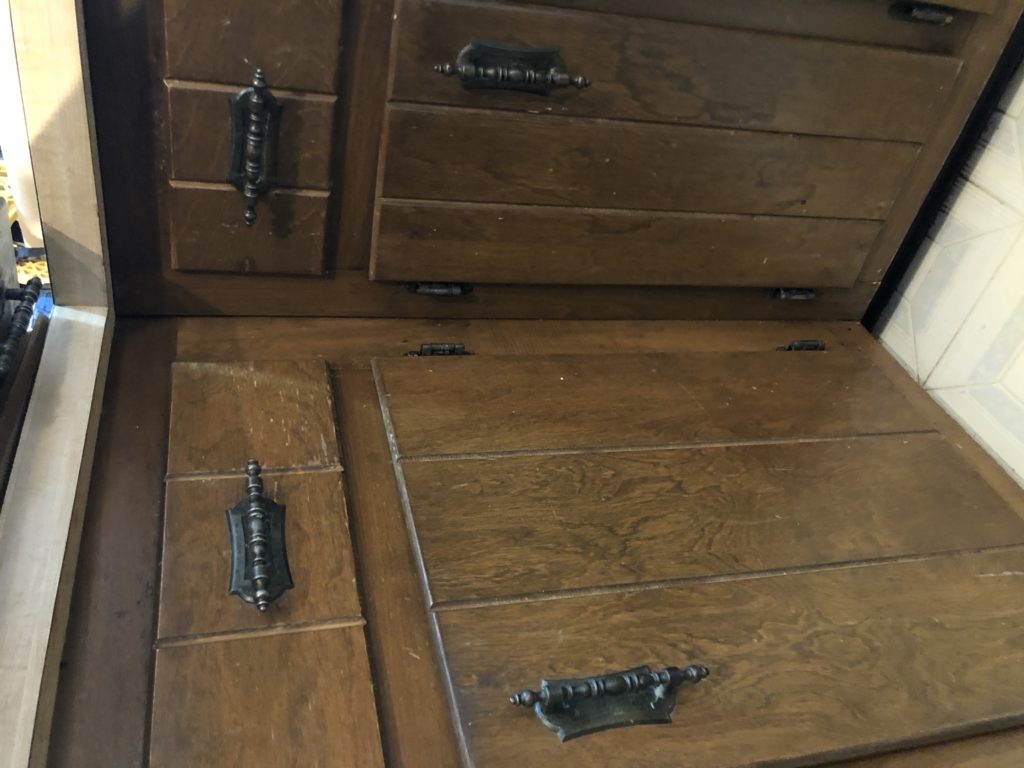
- 60 years of grease, crud , and polish build up: Cleaning is also extremely important with cabinets, and old cabinets are DIRTY. In this case the boxes were cleaner than most, but the doors had a waxy buildup. We speculate this came from a combination of general wear and tear with a furniture polish. Naphtha is a great product for breaking down waxes associated with furniture polish. If using Naphtha, wear as much safety equipment as possible, and/or upgrade to chemical/space suit. It is a nasty, NASTY solvent only brought out for extreme cases.
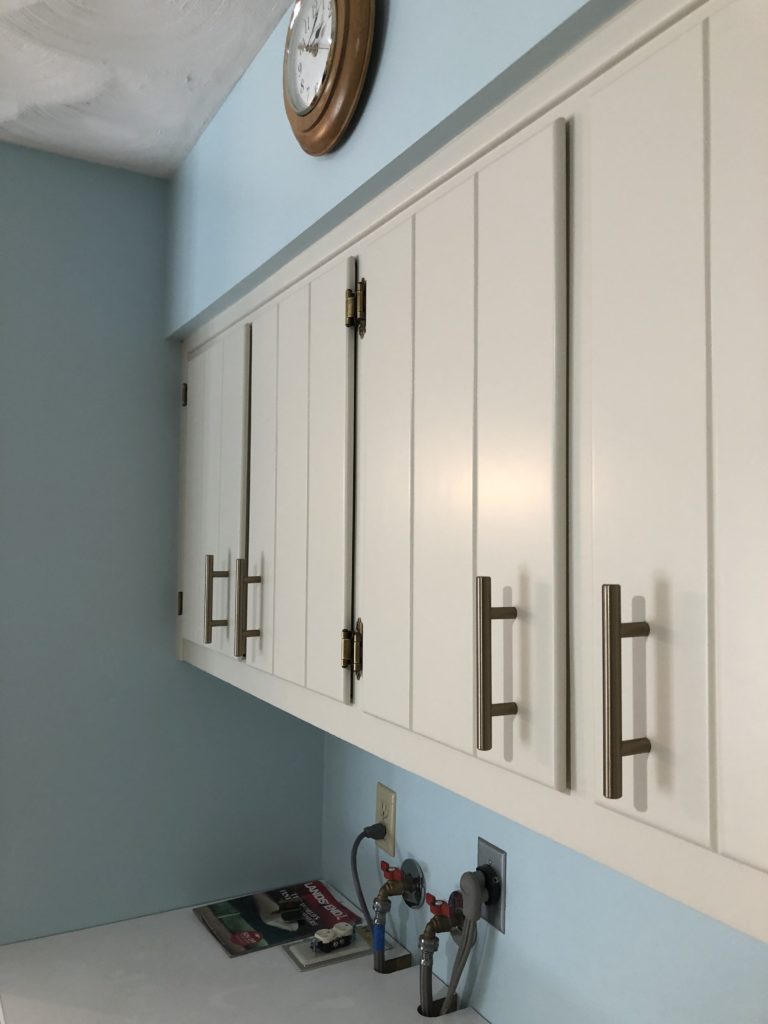
- Hardware replacement: One upgrade that was essential for these cabinets to blend in with the renovation was replacing the hardware. On this set, the Just Add Paint carpentry team filled the existing holes on the door frames and started fresh. Fortunately this “quick fix” did the job without having to go to greater lengths. We suggest flipping out hinges and hardware with something standard BEFORE painting begins. Plan for and solve issues ahead of time to help save $$$ and headaches.
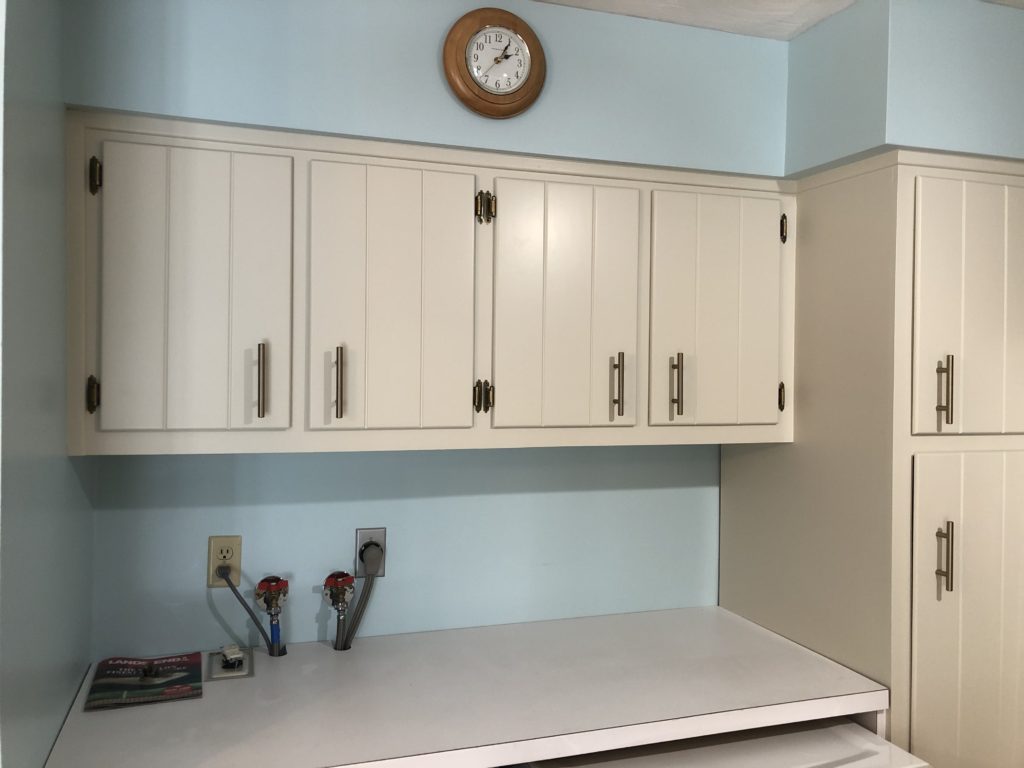

RESULT: THE CUSTOMER LOVES THE JOB! We were also quite happy, and were thankful we got the call for this job. Just Add Paint loves working on all sorts of kitchen cabinets and were glad to bring a modern touch to the home. We even managed keep the classic feel that made it so special in the first place. We think the results were fabulous, and we hope you agree! Please visit our Facebook page and www.facebook.com/Justaddpaint or website www.justaddpaint.net for more projects on both classic and modern homes.
Are you Interested in reading a project profile about painted exterior brick? https://www.justaddpaint.net/painting-brick-in-camp-hill-pa-17011

